Overview
Application Structure
A Glimmer application usually contains:
- Variables - Each variable contains a unique name, a type, and a value. The value of a variable can be changed on the Julia side or on the UI side (using the UI controls). Each variable can be connected to a function that will be called whenever the value is set, either by the UI or Julia.
UI Controls - A tree structure that defines the user interface. This structure can contain UI controls such as labels, fields, sliders, buttons etc., and also some components to help layout the controls in different ways, such as containers, expansion panels, tabs etc.
Rendering Function - A function that will be called every time any of the application variables value is set. This is a convenient way to take into account all the variables values without connecting each one to a separate event handler.
Example
Let's take a look at the Images example in Glimmer package. This example shows how to display an image created using the Images package, and allow the user to manipulate controls that will update the image. You can run the example using:
julia> Glimmer.runExample("Images")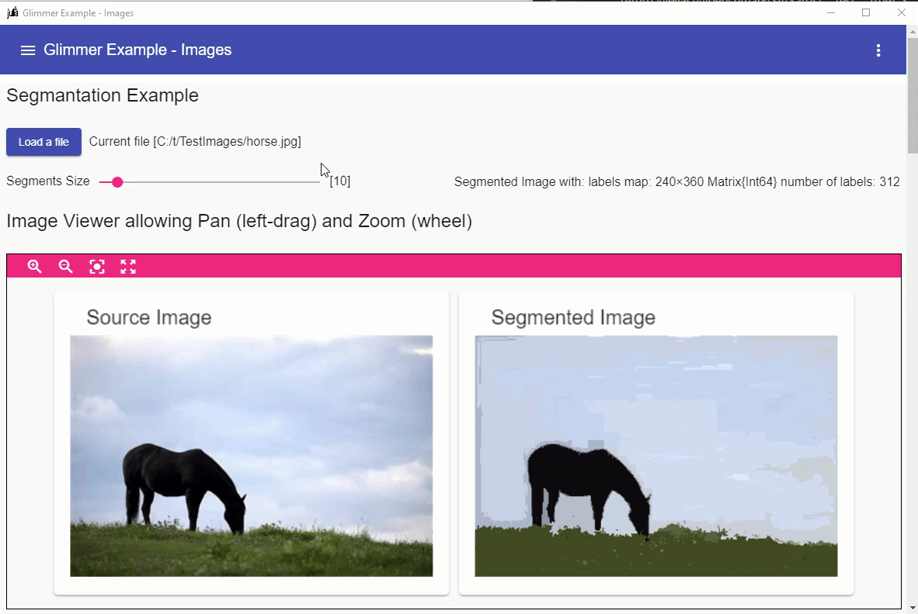
Initilazation
Creating an App object and setting general properties such as the application title and initial window size.
using Glimmer, Glimmer.FlexUI
using Images, ImageSegmentation

app = App()
prop!(app, :title, "Glimmer Example - Images")
prop!(app, :winInitWidth, 1200)
prop!(app, :winInitHeight, 800)
Defining the variables
# image file name
filename = addVariable!(app, Variable(name="filename", type="string", value="C:/t/TestImages/horse.jpg"))
# size of segments
size = addVariable!(app, Variable(name="size", type="int", value=10))
# contains the result of the segmentation
details = addVariable!(app, Variable(name="details", type="string", value=10))
# source and destination images
src_image = addVariable!(app, Variable(name="src_image", type="image", value=""))
dst_image = addVariable!(app, Variable(name="dst_image", type="image", value=""))
Defining the UI
ui = VContainer(
    H1Label("Segmantation Example"),                # Label
    HContainer(
        Button(                                     # Load Button
            text="Load a file",
            fileTypes=".png,.jpg",
            variable="filename",
        ),
        Label(text="Current file [\$(filename)]"),  # Label showing the current file name
    ),
    Container(
        direction = "row warp",
        align = "space-between center",
        children = [
            Slider(                                 # Slider to control the segments size
                text="Segments Size",
                trailingText="[\$()]",              # slider's label can contain a default
                                                    # variable interpolation for its current value $()
                min=2,
                max=100,
                value=8,
                variable="size"
            ),
            Label(text="\$(details)"),              # label showing the segmentation details
                                                    # using the variable interpolation $(details)
        ],
    ),
    H1Label("Image Viewer allowing Pan (left-drag) and Zoom (wheel)"),
    PanZoom(
        style="width: 100%; height: 60vh;  border: 1px solid black;",
        content = Container(
            direction = "row",
            children = [
                Card(
                    title="Source Image",
                    # style=card_style,
                    content=VContainer(
                        Image(                      # Source Image
                            source="\$(src_image)",
                        ),
                    ),
                ),
                Card(
                    title="Segmented Image",
                    # style=card_style,
                    content=VContainer(
                        Image(                      # Segmented Image
                            source="\$(dst_image)",
                        ),
                    ),
                ),
            ]
        ),
    ),

    Glimmer.exampleSourceAsCard(@__FILE__),         # add the source code as the last control
)
# set the controls for the application
controls!(app, ui)
The Rendering Function and others
# utility function to load the current image from disk
function loadImage()
    @info "Loading Image [$(filename[])]"
    global src_img = load(filename[])
    src_image["png"] = src_img
end

# define an event that will trigger when the vriable "filename" is changed
# this function is connected to the variable "filename" we defined above
on(filename) do val
    loadImage()
end

# the render function will be caulled when any of the UI controls changes value
src_img = nothing
function processImages()
    global src_img

    # performing the segmentation using the variable value size ("size[]")
    segments = felzenszwalb(src_img, size[])
    dst_img = map(i->segment_mean(segments,i), labels_map(segments))

    # updating the segmented image and the segmentation details variables
    dst_image["png"] = dst_img
    details[] = "$segments"
end

# defining the rendering function that will be called every time a variable's value is updated
function render()
    processImages();
end
renderFunction!(app, render)
Running the Application
# load the initial image and Run the application
loadImage()
run(app)